
How to Make a Tie-Dye Cake is the perfect way to add color and fun to any celebration. This vibrant dessert is not only visually stunning but also delicious, making it a hit at birthday parties, holidays, or just for a sweet treat at home. The unique tie-dye pattern of the cake captures everyone’s attention, while the homemade vanilla buttercream adds a delightful flavor. Whether you’re baking for kids or adults, this recipe offers an exciting twist on traditional cakes!
Why You’ll Love This Recipe
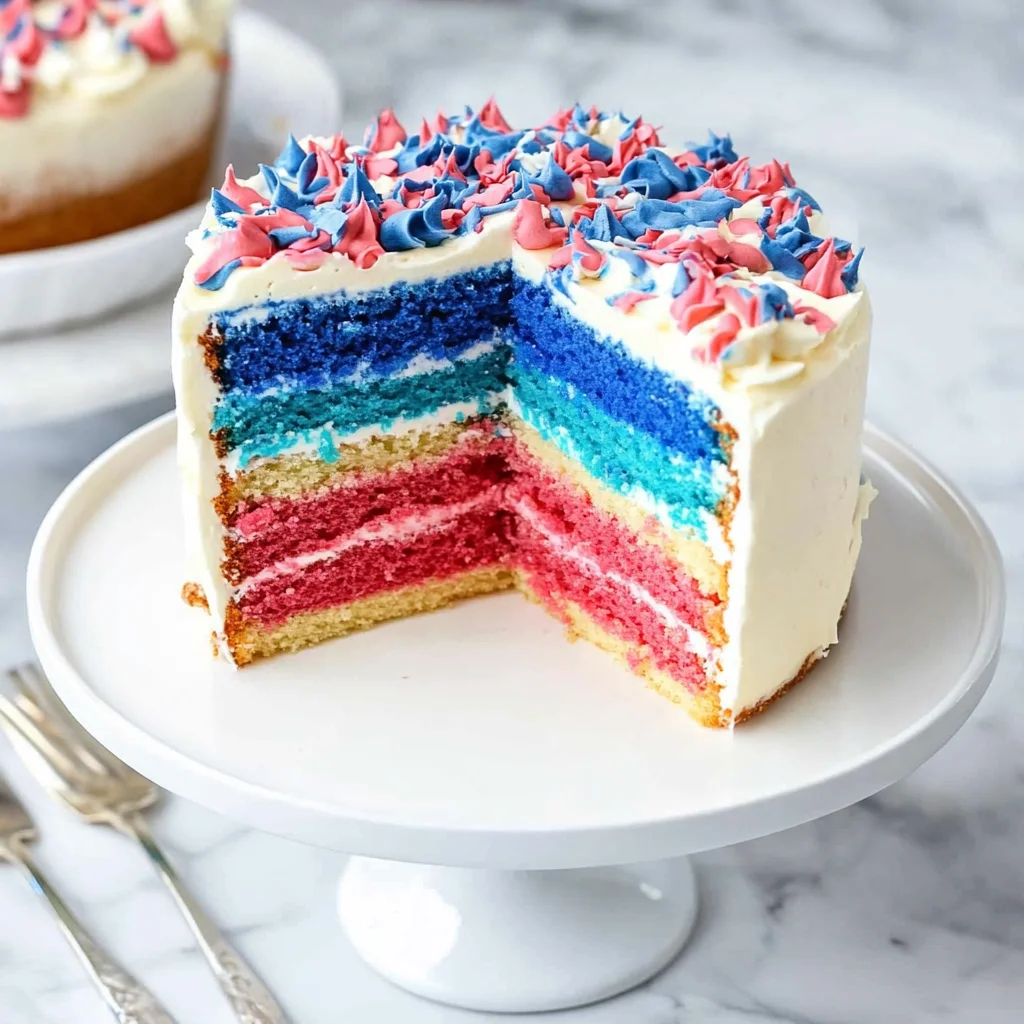
- Visually Stunning: The colorful layers create a show-stopping effect that impresses everyone.
- Customizable Colors: You can use any colors you like, making it suitable for various themes and occasions.
- Simple Ingredients: With just a few basic components, this cake is easy to whip up at home.
- Delicious Flavor: The combination of moist vanilla cake and rich buttercream makes every bite delightful.
- Perfect for All Occasions: Birthdays, holidays, or just a fun weekend treat—the tie-dye cake fits any event.
Tools and Preparation
Before you start baking your tie-dye cake, gathering the right tools will make the process smoother and more enjoyable.
Essential Tools and Equipment
- 9-inch round cake pan (or springform pan)
- Parchment paper
- Mixing bowls
- Rubber spatula
- Food coloring
- Oven
Importance of Each Tool
- 9-inch round cake pan: Ideal size for creating a perfectly shaped layer cake that holds its form well.
- Parchment paper: Ensures easy release of the cake from the pan without sticking.
- Mixing bowls: Necessary for dividing and mixing different colored batters efficiently.
Ingredients
How to make festive, colorful tie-dye homemade vanilla cakes and cupcakes for any occasion. These are always, always a huge hit!
For the Cake
- Recipe for 1-layer sprinkle cake (leave out the sprinkles in the batter)
- Food coloring
For Frosting
- Recipe for homemade vanilla buttercream
For Decoration
- Sprinkles for decoration
How to Make How to Make a Tie-Dye Cake
Step 1: Preheat the Oven
Preheat oven to 350°F (177°C). Grease one 9-inch round cake pan (or 9-inch springform pan), line with a parchment paper round, then grease the parchment paper. Parchment paper helps the cakes seamlessly release from the pans.
Step 2: Prepare the Batter
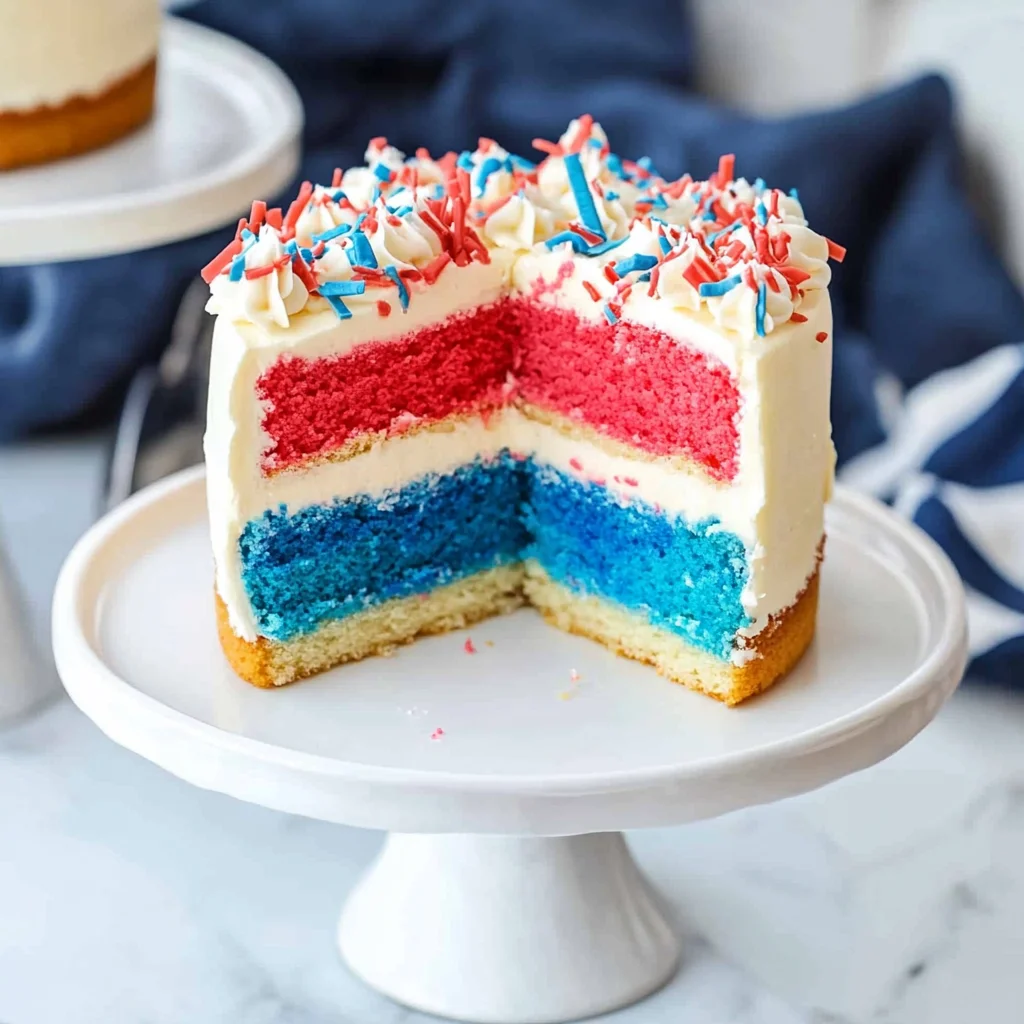
Make the cake batter according to my directions. Divide the white batter into three separate bowls. Grab your food coloring and dye your batters any color you choose. I used 10 drops of red, 10 drops of blue, and left the third bowl plain. Place a separate spoon in each bowl.
Step 3: Create Your Tie-Dye Effect
Scoop large spoonfuls of each batter and layer them into prepared baking pan. It does not have to be pretty; the colors will create a tie-dye effect as they bake.
Step 4: Bake Your Cake
Bake for 20 minutes. Cover loosely with aluminum foil to avoid sticking. Bake for another 13-17 minutes or until a toothpick inserted in the center comes out clean. Allow to cool completely.
Step 5: Frost Your Cake
Make the frosting according to my directions. Frost cooled cake generously with buttercream and decorate as desired with sprinkles.
Enjoy your colorful masterpiece! The tie-dye cake stays fresh covered at room temperature or in the refrigerator for up to five days.
How to Serve How to Make a Tie-Dye Cake
Serving a tie-dye cake adds an extra touch of fun to any gathering. The vibrant colors and delightful flavors are sure to impress your guests. Here are some creative ideas for serving this colorful treat.
For Birthdays
- Slice and Serve: Present generous slices on colorful plates for a birthday celebration. The cake’s vibrant layers will excite kids and adults alike.
- Cupcake Versions: Consider making tie-dye cupcakes for individual servings. They are perfect for party favors or easy grab-and-go treats.
At Holiday Gatherings
- Festive Platter: Arrange the tie-dye cake on a decorative platter surrounded by themed decorations like holiday ornaments or seasonal flowers.
- Pair with Ice Cream: Serve slices of tie-dye cake with a scoop of vanilla or rainbow sherbet ice cream for a delightful contrast in flavor and texture.
For Family Dinners
- Casual Slices: After dinner, slice the tie-dye cake into squares and serve on dessert plates with forks for a relaxed family gathering.
- Coffee Pairing: Offer slices alongside freshly brewed coffee or herbal tea to complement the sweetness of the cake.
How to Perfect How to Make a Tie-Dye Cake
To achieve the best results when making your tie-dye cake, consider these helpful tips. They will ensure that your cake looks stunning and tastes delicious.
- Bold Colors: Use gel food coloring instead of liquid dye for more vibrant shades that won’t alter the batter’s consistency.
- Layering Technique: When layering batters in the pan, scoop them randomly rather than in neat rows. This enhances the tie-dye effect during baking.
- Cool Completely: Allow the cake to cool completely before frosting. This prevents the frosting from melting and losing its shape.
- Storage Tips: Store leftover slices in an airtight container at room temperature or refrigerate to maintain freshness.
- Experiment with Flavors: Don’t hesitate to mix different flavors of cake batter, like chocolate or strawberry, for a unique twist on your tie-dye creation.
Best Side Dishes for How to Make a Tie-Dye Cake
Complementing your tie-dye cake with side dishes can elevate your dessert experience. Here are some tasty options that pair well with this festive treat.
- Fruit Salad: A refreshing mix of seasonal fruits adds brightness and balances the sweetness of the cake.
- Whipped Cream: Lightly sweetened whipped cream served on the side provides a creamy contrast that many enjoy.
- Chocolate Ganache: Drizzle warm chocolate ganache over each slice for an indulgent finish that chocolate lovers will appreciate.
- Ice Cream Sundae Bar: Set up an ice cream bar with various toppings, allowing guests to create their own sundaes alongside their cake slice.
- Cheese Platter: Include a variety of cheeses, such as brie or cheddar, which can provide a savory balance to the sweet dessert.
- Cookies: Offer assorted cookies as additional treats; they can be enjoyed alongside or after the tie-dye cake for more variety.
Common Mistakes to Avoid
Making a tie-dye cake can be a fun experience, but it’s important to avoid common pitfalls.
-
Skipping the Parchment Paper: Not using parchment paper can lead to your cake sticking to the pan. Always line your cake pan with parchment and grease it well for easy release.
-
Overmixing the Batter: Mixing too much can make your cake dense. Stop mixing as soon as the ingredients are combined for a light and fluffy texture.
-
Not Measuring Food Coloring Carefully: Using too much food coloring can result in an overpowering flavor or an unappealing look. Start with a few drops and add more gradually until you achieve your desired color.
-
Ignoring Baking Times: Baking times may vary based on your oven. Always check for doneness by inserting a toothpick in the center; it should come out clean.
-
Frosting While Warm: Frosting a warm cake can cause the frosting to melt and slide off. Make sure your cake is completely cooled before applying frosting for the best results.
Storage & Reheating Instructions
Refrigerator Storage
- Duration: Your tie-dye cake will stay fresh for up to 5 days when stored properly.
- Container: Use an airtight container to keep it moist and flavorful in the fridge.
Freezing How to Make a Tie-Dye Cake
- Duration: You can freeze your tie-dye cake for up to 3 months.
- Wrap It Well: Wrap the cooled cake tightly in plastic wrap, then place it in a freezer-safe bag or container.
Reheating How to Make a Tie-Dye Cake
- Oven: Preheat your oven to 350°F (177°C). Place the cake on a baking sheet covered with foil and heat for about 10-15 minutes.
- Microwave: Use short intervals of 15-20 seconds until warmed through. Be cautious not to overheat, as this may dry out the cake.
- Stovetop: If you have leftover slices, wrap them in foil and place them in a skillet over low heat for about 5 minutes, checking frequently.
Frequently Asked Questions
What type of food coloring works best for how to make a tie-dye cake?
Gel food coloring is often recommended because it’s more concentrated than liquid dye and produces vibrant colors without altering the batter’s consistency.
Can I use box mix instead of homemade batter?
Yes! If you prefer convenience, using store-bought cake mix is perfectly fine. Just follow the same instructions for dyeing and layering the batter.
How do I customize my tie-dye cake?
You can customize by choosing different colors or adding flavors like lemon or almond extract to enhance the taste. Sprinkles can also be added for extra fun!
How long does it take to make a tie-dye cake?
The total time is approximately 3 hours, including preparation, baking, cooling, and frosting time.
Final Thoughts
This tie-dye cake recipe is not only visually stunning but also versatile enough for any occasion. With options for customization, such as different colors and flavors, you can create something unique every time. I encourage you to try making this delightful dessert that is sure to impress friends and family!
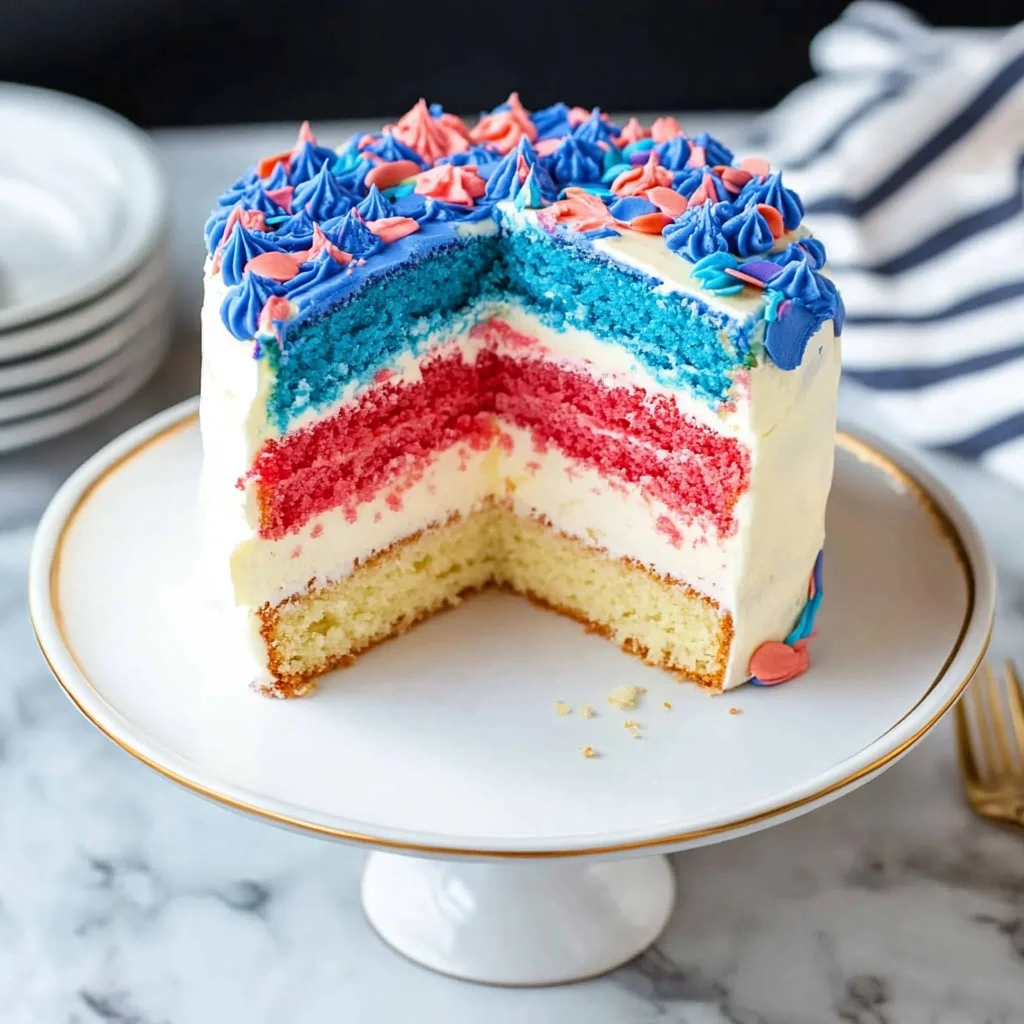
Tie-Dye Cake

Bring vibrancy and joy to your next celebration with this stunning tie-dye cake. Perfect for birthdays, holidays, or any occasion that calls for a sweet treat, this cake dazzles with its eye-catching colors and delectable homemade vanilla buttercream frosting. With just a few simple ingredients and easy steps, this fun dessert is not only visually impressive but also deliciously moist. Customize the colors to match your theme and surprise your guests with each slice of this delightful creation.
- Prep Time: 30 minutes
- Cook Time: 35 minutes
- Total Time: 1 hour 5 minutes
- Yield: Serves approximately 10 slices 1x
- Category: Dessert
- Method: Baking
- Cuisine: American
Ingredients
- 1 layer vanilla cake mix (homemade or store-bought)
- Food coloring (gel preferred)
- Homemade vanilla buttercream frosting
- Sprinkles for decoration
Instructions
- Preheat your oven to 350°F (177°C) and prepare a 9-inch round cake pan with parchment paper.
- Mix the cake batter according to your recipe; divide it into three bowls.
- Add food coloring to each bowl, creating vibrant shades.
- Layer spoonfuls of each colored batter randomly in the pan to achieve a tie-dye effect.
- Bake for 20 minutes, then cover loosely with foil and bake for an additional 13-17 minutes until a toothpick comes out clean. Allow cooling completely.
- Frost the cooled cake generously with vanilla buttercream and decorate with sprinkles.
Nutrition
- Serving Size: 1 serving
- Calories: 360
- Sugar: 28g
- Sodium: 180mg
- Fat: 15g
- Saturated Fat: 9g
- Unsaturated Fat: 5g
- Trans Fat: 0g
- Carbohydrates: 54g
- Fiber: 1g
- Protein: 3g
- Cholesterol: 40mg
Leave a Comment